Home > Note > Web Development

Web Development Method

1. Github Page

1.1 Choose Github Page as the Targeted Page

(1) Create a repository with name following your username

  • eg. with my username as Viiiikey,the repository name must be Viiiikey.github.io

(2) If you prefer git push instead of the local github app:

1
2
3
4
5
6
*cd to folder '123'
cd 123
git add .
git commit -m 123

git push

1.2 Github Only Works as A Host

(1) Name your new repository randomly without Readme.md
(2) copy url to local Github app
(3) push in the github app directly
(4) Delpy the repository to the third party like Vercel and Netlify

Note: Other Platforms like aaPanel work the same way

2. Python Web Development Methods

2.1 Streamlit

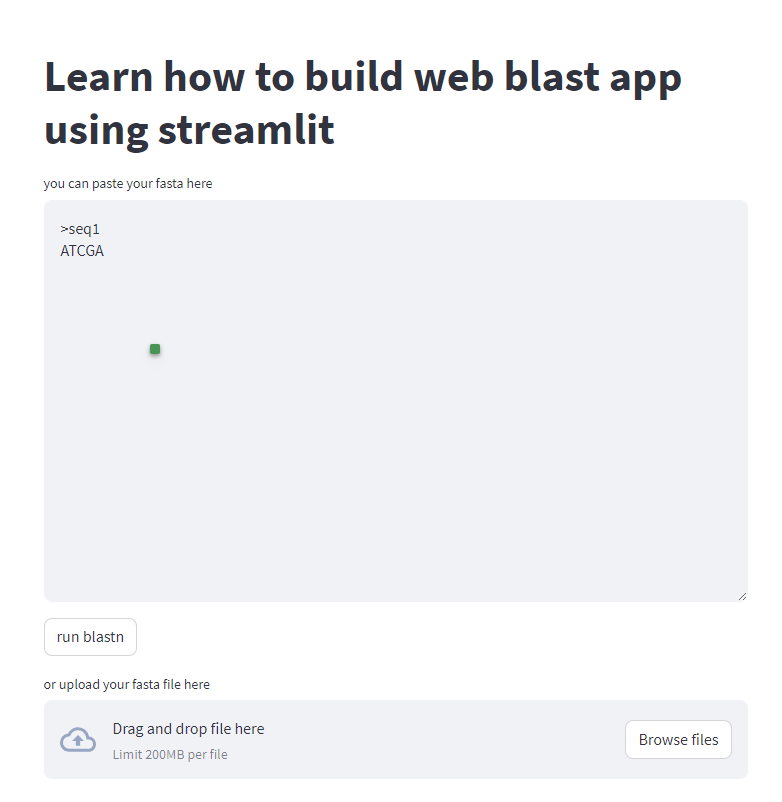
It only takes a few lines of code to create an interactive,visual dashboard.
(1) Case 1:Simple Uploading Files and Inputting Content
Run it in Anaconda Prompt

1
`streamlit run C:/Users/hp/Main-Streamlit-Page.py`
1
1
2
3
4
5
6
7
8
9
10
11
12
13
14
15
16
17
18
19
20
21
22
23
24
25
26
27
28
29
30
31
32
33
34
35
36
37
38
39
40
41
42
43
44
45
46
47
48
49
50
51
52
53
54
55
56
57
58
59
60
61
62
63
64
65
66
67
68
69
70
71
72
import streamlit as st
import tempfile
import os
import io
from Bio import SeqIO
import subprocess
from Bio.Blast import NCBIXML
import pandas as pd

st.title("Learn how to build web blast app using streamlit")
you need to change this path to you own

blastn = "D:/Biotools/blast/ncbiblast/bin/blastn"
db = 'D:/Bioinformatics_Intro/streamlit/uploadfiles/blastdb/cpvirus'
tempfile.tempdir = "D:/Bioinformatics_Intro/streamlit/uploadfiles/temp"

fasta = st.text_area(label="you can paste your fasta here",
value=">seq1\nATCGA",
height=400)

runblastn = st.button("run blastn")

names = "qseqid sseqid pident length mismatch gapopen qstart qend sstart send evalue bitscore".split()

if runblastn:
tmp = tempfile.NamedTemporaryFile(suffix=".fasta",delete=False)
st.write(tmp.name)
tmp.write(bytes(fasta,'utf-8'))
tmp.seek(0)
for rec in SeqIO.parse(tmp.name,'fasta'):
st.write(rec.id)

cmd = [blastn,'-db',db,'-query',tmp.name,'-evalue','0.0001','-outfmt','6']
process = subprocess.Popen(cmd,stdout=subprocess.PIPE,
stderr=subprocess.PIPE,
universal_newlines=True)
stdout,stderr = process.communicate()

df = pd.read_csv(io.StringIO(stdout),sep="\t",header=None,names=names)
st.dataframe(df)
tmp.close()
os.unlink(tmp.name)

uploaded_file = st.file_uploader("or upload your fasta file here")

if uploaded_file is not None:
bytes_data = uploaded_file.getvalue()
#print(type(bytes_data))
#st.write(bytes_data)
tmp = tempfile.NamedTemporaryFile(suffix=".fasta",delete=False)
st.write(tmp.name)
try:
tmp.write(bytes_data)
tmp.seek(0)
with open(tmp.name,'r') as fr:
for line in fr:
if line.startswith(">"):
st.write("input seq id is: %s"%(line.strip().replace(">","")))

cmd = [blastn,'-db',db,'-query',tmp.name,'-evalue','0.0001','-outfmt','6']
process = subprocess.Popen(cmd,stdout=subprocess.PIPE,
stderr=subprocess.PIPE,
universal_newlines=True)
stdout,stderr = process.communicate()
# for record in NCBIXML.parse(io.StringIO(stdout)):
# st.write(record.query)

df = pd.read_csv(io.StringIO(stdout),sep="\t",header=None,names=names)
st.dataframe(df)
finally:
tmp.close()
os.unlink(tmp.name)

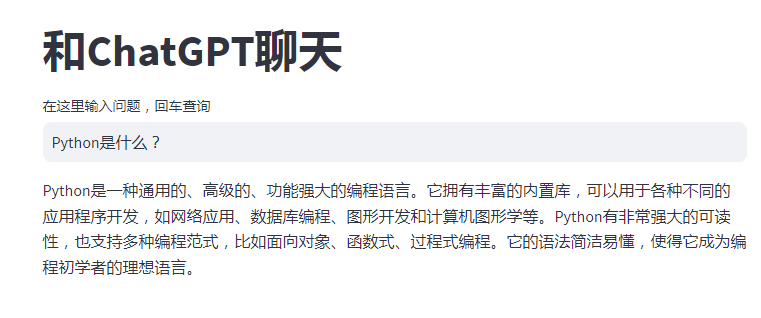
(2) Case 2:Webpage for Conversational Chat by the ChatGPT API
2

1
2
3
4
5
6
7
8
9
10
11
12
13
14
15
16
17
18
19
20
21
22
23
24
25
26
27
28
29
30
31
32
33
34
35
36
37
38
39
import streamlit as st
import openai
# Set Title and Communicate with Each Other

st.title("Chat with ChatGPT")
st.sidebar.header("Function Introduction")
st.sidebar.info(
'''This is a web application that enables interactive chatting through the OpenAI API and the ChatGPT model. Enter your questions in the text box, press Enter to query, and receive responses from ChatGPT.'''
)
# Set Model and Key

model_engine = "text-davinci-003"
openai.api_key = "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"

def ChatGPT(user_query):
"""
Generate answers using the OpenAI API, select models, and configure parameters.
"""
# Use OpenAI API to Generate the Answer
completion = openai.Completion.create(
engine=model_engine,
prompt=user_query,
max_tokens=1024,
n=1,
temperature=0.5,
)
response = completion.choices[0].text
return response

def main():
"""
Get user input, submit it to ChatGPT, and print the output.
"""
# Get Question Information
user_query = st.text_input("Input your question here, press Enter to query.", "What is Python?")
if user_query != ":q" or user_query != "":
# Give the Question to ChatGPT, Return the Results
response = ChatGPT(user_query)
return st.write(f"{response}")

3.Case 3:Random ForestIris

1
2
3
4
5
6
7
8
9
10
11
12
13
14
15
16
17
18
19
20
21
22
23
24
25
26
27
28
import streamlit as st
import pandas as pd
from sklearn import datasets
from sklearn.ensemble import RandomForestClassifier

# Users input data:
def user_input_features():
sepal_length = st.sidebar.slider('Sepal length', 4.3, 7.9, 5.4)
sepal_width = st.sidebar.slider('Sepal width', 2.0, 4.4, 3.4)
petal_length = st.sidebar.slider('Petal length', 1.0, 6.9, 1.3)
petal_width = st.sidebar.slider('Petal width', 0.1, 2.5, 0.2)
data = {'sepal_length': sepal_length, 'sepal_width': sepal_width,
'petal_length': petal_length, 'petal_width': petal_width}
features = pd.DataFrame(data, index=[0])
return features
df = user_input_features()

# Load Iris Set and Train the Model

iris = datasets.load_iris()
X = iris.data
Y = iris.target
clf = RandomForestClassifier()
clf.fit(X, Y)
# Categorize and display input data.
prediction = clf.predict(df)
prediction_proba = clf.predict_proba(df)
st.write('Categorization Results:' + iris.target_names[prediction][0])
3

Others:

3. Other Open Source Web Development Tools

3.1 NotionNext

3.2 Hugo(Go)

Visit Locally:
(1) Create a Folder “hugo”,put hugo.exe into it.
(2) Input cmd at the folder path where folder hugo is,input hugo site new site,put the targeted template in the theme folder in the new established site

Note:when git clone the online template,you should choose the ones with exampleSite

(3) Open examplesite,copy all the files to the folder site
(4) Delete the automatically generated hugo.toml

Otherwies, page not found will show up

(5) Open config.toml,change the project name as the cloned theme name

1
2
theme=" "
# you choose *wiki*,theme="wiki"

(6) Back to the folder of sitecmd,input

1
hugo serve

If error occurs, you might delete xx.md by searching twitter.
Then push it to cloud:

(7) Continue in the folder of sitecmd,input

1
hugo -D

(8) Open the newly generated public file in the site folder,copy it to the folder xx.github.io

there are only .git and README in the xx.github.io folder

1
Commit to main,push origin

(9) refresh,wait,done!

(10) You might choose the third party deployment after that.

3.3 Hexo(Node.js)

(1) Create folder blog,under the blog,right-click to open git bash,input:

1
hexo init,npm instal,hexo cl,hexo g,hexo s

(2) Clone template to the theme folder

1
git clone  https://github.com/PhosphorW/hexo-theme-academia

(3) install necessary packages

1
2
npm install hexo-renderer-pug hexo-renderer-stylus --save
hexo cl,hexo g,hexo s

if the content of hexo is blanked,input:

1
> hexo n post"any title",hexo cl,hexo g,hexo s

(4) Deploy on github:

1
2
3
4
5
6
git config --global user.name"viiiikedy"
git config --global user.email "vickydu1213@gmail.com"
ssh-keygen -t rsa -C "vickydu1213@gmail.com"
ssh -T git@github.com
hexo d
hexo cl,hexo g,hexo s

(5) Use txt to open id_rsa file to github and refine SSH
(6) Refine the local network address:

1
hexo server -p 5000

3.3 Jekyll(Ruby)

(1) Download the latest edition of Ruby+Devkit officially
(2) Input ruby -v and gem -v to check whether the installment is successful
(3) Install Jekyll 和 Bundler gems:

1
put gem install jekyll bundler 来安装

(4) Input jekyll -v and bundle -v to check
(5) Choose one empty folder to create new blog site:

1
2
3
4
jekyll new myblog
cd myblog
bundle add webrick
bundle exec jekyll serve

(6) Successful Address: http://127.0.0.1:4000/

Use Template:
(1) Create one empty folder, cmd,input:

1
2
git init
git clone https://github.com/cotes2020/

(2) Open the cloned template folder,input:

1
2
bundle install
bundle exec jekyll serve

3.4 gitbook

You need to change the edition of nvm: node 14 for hexo,node 10 for gitbook:

1
2
3
4
5
nvm install 14
nvm use 14
#or
nvm install 14
nvm use 14

SEO Follow-Up Optimization

Source Code of VIRA Website

1
2
3
4
5
6
7
8
9
10
11
12
13
14
15
16
17
18
19
20
21
22
23
24
25
26
27
<title>VIRA | An Education Social Enterprise in China</title>
<html lang="en">
<head>
<!-- Meta Tags -->
<meta charset="utf-8">
<meta content="width=device-width, initial-scale=1, shrink-to-fit=no" name="viewport">
<!-- Author -->
<meta name="author" content="Themes Industry">
<!-- description -->
<meta name="description" content="MegaOne is a highly creative, modern, visually stunning and Bootstrap responsive multipurpose studio and portfolio HTML5 template with 8 ready home page demos.">
<!-- keywords -->
<meta name="keywords" content="Creative, modern, clean, bootstrap responsive, html5, css3, portfolio, blog, studio, templates, multipurpose, one page, corporate, start-up, studio, branding, designer, freelancer, carousel, parallax, photography, studio, masonry, grid, faq">
<!-- Page Title -->
<title>VIRA | An Education Social Enterprise in China</title>
<!-- Favicon -->
<link href="http://www.fusinnovations.com/uploadfile/202205/d16b7ff08ea7eb.png" rel="icon" />
<!-- Bundle -->
<link href="http://www.fusinnovations.com/static/skin/css/bundle.min.css" rel="stylesheet">
<!-- Plugin Css -->
<link href="http://www.fusinnovations.com/static/skin/css/LineIcons.min.css" rel="stylesheet">
<link href="http://www.fusinnovations.com/static/skin/css/revolution-settings.min.css" rel="stylesheet">
<link href="http://www.fusinnovations.com/static/skin/css/jquery.fancybox.min.css" rel="stylesheet">
<link href="http://www.fusinnovations.com/static/skin/css/owl.carousel.min.css" rel="stylesheet">
<link href="http://www.fusinnovations.com/static/skin/css/cubeportfolio.min.css" rel="stylesheet">
<!-- Style Sheet -->
<link href="http://www.fusinnovations.com/static/skin/css/style.css" rel="stylesheet">
</head>

Note

1. Tools for Website Developing:

2. Questions Not Solved

My simple Project

Link:here